3 Simple Photoshop Tricks for Beginners
In this step by step tutorial I will be showing you 3 super simple tricks in Photoshop that even a beginner can handle. We will cover making an image black and white, then converting it to a monotone color, and lastly clipping an image inside some text. If you string all 3 steps together you can achieve a pretty cool design! As an example, I will be creating a simple holiday-themed graphic. Before we get started, choose the image you would like to manipulate. Make sure the image is a high resolution so you won’t end up with a blurry mess! I suggest around 2000×1500 pixels at least.
Converting to Black & White
This step is going to be the simplest step in the process. Start out by opening your image in Photoshop. There are a few different ways you can go about changing your image to grayscale (black and white) but the simplest way to go about it is using Image > Mode > Grayscale. Below I’ve included a before and after shot.

Converting a Black and White image to Monotone
This step is going to build off the previous step. Keep in mind if you want to do this step alone you will have to first convert your image to grayscale. With your grayscale image, all you need to do is once again go to Image > Mode but this time instead of choosing Grayscale, choose Duotone. When you select this a pop up will appear like below.
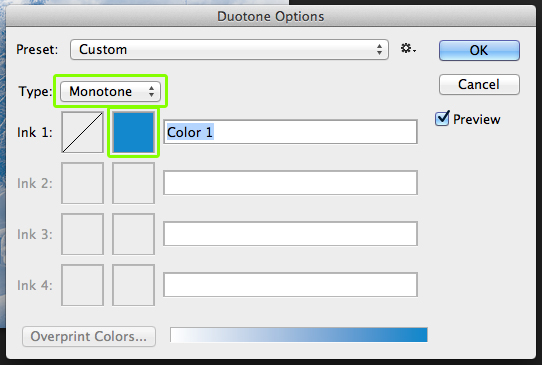
In the “Type” drop-down box it will likely say “Duotone”, click on it and change it to say Monotone like highlighted above. Then double click on the colored square (also highlighted) so that a color selection box opens up. Choose whatever color you want.

Clipping an Image into Text
This step is a little more tricky than the first two and requires a couple different steps. First you are going to want to create a new layer underneath your image. If your image has a little lock next to it just double click on it to unlock. To create a new layer with color I simple draw a rectangle larger than the canvas size and drag the layer underneath my photo in the layers panel. You will notice your new background layer will appear the same color you chose for your image. You can keep it this way or you can select a new color. If you choose a new color like I did simply select the layer and go to Image > Mode > RGB Color. Your image should stay monotone but now you are able to choose any color for your background by double clicking the rectangle in the layers panel.
Now for the text. I would suggest choosing a nice fat font so you can get a good bit of the image in it, if you choose a thin font you probably will not be able to tell what the image is. Type your text on top of you image, I choose “Happy Holidays” to stick with the theme.

Now all you have to do is drag your text right below your monotone image, and hover over the line in between them holding the ALT key. You will see a little clipping icon appear and just click. You will see your image has been contained to inside your text!

Using a combination of these 3 simple tricks you can make a wide range of designs! Happy photoshopping!
By: Blueprint
The comments are closed.
No reviews yet